Appearance
Guided Wizard
The Guided Wizard is a 7-step interactive workflow designed to help you build a complete, structured semantic domain model or ontology from scratch—without needing deep ontology engineering expertise or complex syntax knowledge like OWL or RDF.
You can access the Guided Wizard via in the top navigation bar or right sidebar tool selector, or by clicking the Guided Wizard button on an empty canvas.
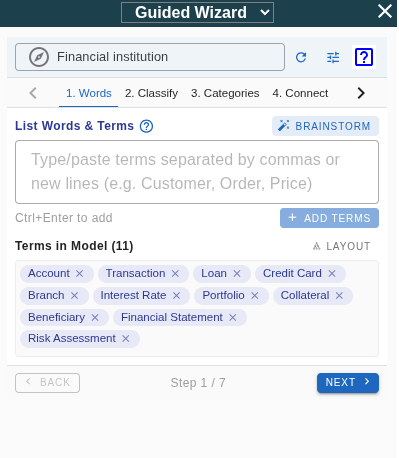
Header Controls
At the top of the Guided Wizard, you have quick access to essential domain and canvas tools:
- Topic / Domain Input: Enter the main theme or domain of your model (for example: Sales Process, Customer Care, or Supply Chain). This sets the document name and provides context for AI assists.
- Refresh Layout (): Instantly re-calculates the graph layout on the canvas.
- Layout Settings (): Opens layout parameters to adjust spacing, physics, or layout algorithms.
- Help Button (): Opens this documentation page in the user manual.
The 7-Step Workflow
The wizard breaks down semantic modeling into seven approachable steps:
1. Words ➔ 2. Classify ➔ 3. Categories ➔ 4. Connect ➔ 5. Columns ➔ 6. Define ➔ 7. DoneYou can navigate sequentially with the Back and Next buttons at the bottom, or click any step tab at the top to jump directly.
Step 1: Words (Brain Dump)
List all the terminology, concepts, entities, and data items you work with daily in your domain.
- Add Terms: Type or paste terms separated by commas or new lines (e.g.
Customer, Order, Product, Price, Order Date). Press Ctrl + Enter to add them immediately. - AI Brainstorm: If an AI provider is configured in AI Settings, click Brainstorm to automatically generate relevant terminology suggestions based on your topic. Click individual suggestion chips or Add All to add them to your model.
- Terms in Model: View all current terms as tags. You can remove terms by clicking their delete button () or trigger a quick graph layout.
Modeling Tip
Do not worry about technical classification or structure in Step 1. Just capture the words and vocabulary of your business domain first.
Step 2: Classify (Table vs. Column)
Decide whether each term represents a Table (Entity / Concept / Record) or a Column (Property / Attribute / Detail field):
- 📊 Table (Concept / Entity): Main business objects or sheets (e.g. Customer, Order, Product, Invoice).
- 📋 Column (Property / Field): Attributes, metrics, or details that describe a table (e.g. Price, Order Date, Status, Email).
Features:
- One-Click Toggle: Switch any term between Table and Column with a single click.
- Filter Toggle Tabs: Filter your list by All, Unsure (unclassified terms), Tables, or Columns.
- Auto-Classify with AI: Let AI automatically categorize terms into tables or columns based on standard domain modeling conventions.
Step 3: Categories (Hierarchy / Taxonomy)
Organize specific tables under broader parent categories using standard taxonomic relationships ("is a kind of" / Generalization).
Examples:
- Laptop is a kind of Product
- Manager is a kind of Employee
- Inpatient is a kind of Patient
Features:
- Parent Selector: For each table, choose an existing parent category from the dropdown or type a new category name to create it automatically. Leave blank for root concepts.
- AI Suggestions: Click Suggest to let AI analyze your concepts and recommend logical category groupings.
Step 4: Connect (Table Relationships)
Connect your tables together using natural business statements:
[ Subject Table ] ──( Relationship Verb )──▶ [ Target Table ]Examples:
- Customer places Order
- Order contains Product
- Doctor treats Patient
Features:
- Table Cards: Expand any table card to manage its outgoing and incoming connections.
- Verb Presets: Choose from common domain verbs (places, contains, belongs to, manages, creates, uses, relates to, has) or type custom verbs.
- Interactive Target Selector: Select existing tables or type a new table name to connect and create on the fly.
Step 5: Columns (Attach Properties)
Assign each column (property/field) to the specific Table it describes using Attributive relationships (has property, has attribute, has field).
Examples:
- Product has property Price
- Order has property Order Date
- Customer has property Email
Features:
- Table Property Cards: Expand each table card to attach existing unassigned columns or create new properties directly.
- Visual Grouping: In the graph canvas, properties are neatly attached and styled to distinguish them from core entity tables.
Step 6: Define (Plain Definitions)
Document clear, accessible definitions for each term to ensure business alignment and provide rich context for LLMs.
Features:
- Plain-English Guidelines: Write simple 1-sentence explanations. Avoid circular definitions (such as "A Customer is a person who is a customer").
- Filter Tabs: Filter by All, Missing (terms still needing definitions), or Defined.
- AI Definition Generator: Click Generate to have AI draft accurate 1-sentence definitions for all missing terms in your model. Review and click Accept All or accept individual definitions.
Step 7: Done (Summary & Next Steps)
Review a summary of your newly constructed domain model and choose your next action:
- Model Summary: See total counts of Tables, Columns, Relationships, and Defined terms.
- Explore Graph Canvas: Center and zoom the canvas () to interactively inspect nodes and relationships.
- Auto-Arrange Layout: Apply physics-based layout algorithms to optimize graph readability.
- Validate Quality (Model Checks): Open Model Checks to run 15 automated semantic validation rules (checking for isolated terms, cycles, missing definitions, etc.).
- Export & Ground LLMs: Export your structured model via Import / Export to JSON, Excel, OWL ontology, JSON-LD, or copy structured context for grounding LLM prompts.