Appearance
Add in Bulk/Chatbot
You can select this tool via
This feature lets you select a prompt.
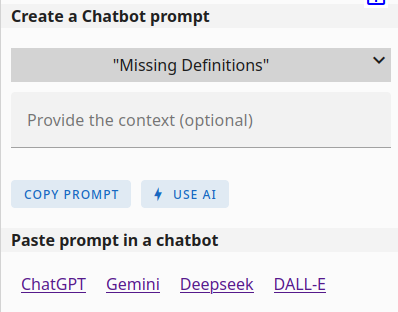
Based on the prompt you've chosen, you'll see additional input fields:
- Provide the subject: This field is mandatory for this prompt. Specify the core topic for which you want the prompt to generate information. For example, entering "Car" will instruct the chatbot to create a semantic data model related to cars.
- Provide the context: This field is optional. If the chatbot's initial response is too general, you can provide more specific context here. For instance, you could enter "Retail sales" to focus the data model on car sales rather than car parts in general.
- Paste your text: This field will only be visible if you've selected a prompt that requires text analysis. Here, you can paste the specific text that you want the chatbot to process and extract information from.
If AI API is configured (see here) you will see 2 buttons:
- Copy Prompt: This will copy a prompt text to your clipboard. You can then paste this prompt into a chatbot. The chatbot's response can be copied and pasted back into the below term input field, allowing for the automatic addition or updating of terms and relations.
- USE AI: This will automatically call the AI and update the graph.
If AI API is not configured you will see a message instead of the USE AI button.
Paste prompt in a chatbot
Only needed when you have selected the COPY PROMPT button. This gives some handy links to different chatbots. Pick your favorite chatbot and paste the value from your clipboard (CTRL-V) into it and wait for the response.
Bulk add terms and relations:
You can select how the import will behave in the import options
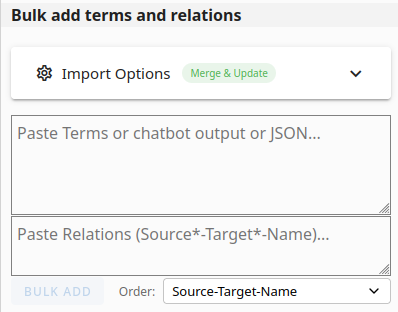 * Paste the chatbot's response in the Paste Terms box * **New:** You can now paste combined Terms and Relations data (including section headers) into a single box.
 Manual Entry
This section can also be used for quickly adding or updating terms and relations manually. Simply paste or type a few terms and their details into the "Terms" box, and similarly for relations in the "Relations" box.
Table Format Requirements
Smart Column Mapping (Recommended)
Use a header comment line starting with # to define your columns in any order:
Terms Example:
# name | parent | description | type
Dog | Animal | A domestic canine | term
Cat | Animal | A domestic feline | term
Relations Example:
# source | target | relationName | description
Customer | Order | places | Customer places an order
Order | Product | contains | Order contains products
Combined Format (Model Export)
You can paste data that includes both Terms and Relations sections. Use section markers to separate them:
# Model: My Project
## Terms
# name | description | type | xfield:status
Customer | A buyer | concept | Active

## Relations
# source | relationName | target | cardinality
Customer | places | Order | *
Key Features:
- Section Detection: Automatically splits content marked with
## Termsand## Relations. - Robust Headers: The header line (starting with
#) can be anywhere in the first 10 lines, allowing for titles and section markers. - Auto-Cleaning: Skips divider lines (e.g.,
# ------) automatically.
Column Reference
Term Columns
| Column | Required | Description |
|---|---|---|
name | Yes | The term name (must be unique) |
description | No | A brief definition or explanation |
additionalInformation | No | Extended details, notes, or HTML content |
url | No | URL to an image (must end with .jpg or .png) |
parent | No | Name of parent term (creates grouping) |
synonyms | No | Comma-separated list of alternative names (e.g., car, automobile, vehicle) |
type | No | Term type: term, concept, group, or property |
weight | No | Numeric weight value (requires "Use Term Weights" enabled) |
Relation Columns
| Column | Required | Description |
|---|---|---|
source | Yes | Name of the source term |
target | Yes | Name of the target term |
relationName | No | Name of the relation (e.g., has, contains, is-a) |
description | No | A brief description of the relation |
additionalInformation | No | Extended details or notes |
cardinality | No | Target cardinality (e.g., 1, 0..1, *, 1..*) |
cardinalitySource | No | Source cardinality (when enabled) |
weight | No | Numeric weight value (requires "Use Relation Weights" enabled) |
Extra Fields (xFields)
You can include Extra Fields directly in your header using the xfield: prefix:
Example with Extra Fields:
# name | description | xfield:status | xfield:priority
Customer | A person who buys | Active | High
Order | A purchase request | Pending | Medium
Product | An item for sale | Draft | Low
Key Features:
- Auto-creation: If an Extra Field doesn't exist, it will be created automatically as a text field
- Case-insensitive: Both the
xfield:prefix and field names are matched case-insensitivelyXFIELD:STATUSwill reuse an existingstatusfieldxfield:Priorityandxfield:priorityare treated as the same field
- Works for both: Terms and Relations support xField columns
INFO
Column names are case-insensitive. Unknown column names are silently ignored.
Legacy Format (No Header)
If no header line is provided, columns are interpreted by position:
- Terms:
Name | Description | URL/Additional Information - Relations:
Source | Target | Name | Description | Additional Information(orSource | Name | Targetdepending on your relation order setting)
Additional Notes
- Comments: Lines starting with
#are ignored (except when used as a header line) - Line breaks: Each term/relation on a new line, or use
\nfor line breaks - Separators: Tab, pipe (
|), semicolon (;), colon (:), or comma (,) - auto-detected
JSON format requirements: see here
You can provide terms, relations or both.