Appearance
User Story Mapping: An Approach to Product Development
Skip right away to the explanation of how you can create a user story map with Termboard here, or read the theory below.
Understanding user needs and prioritizing work are key in product development. User Story Mapping is a visual technique that helps product teams get clear on what to build. It connects high-level ideas to specific actions, making it useful for different roles in an organization.
Who Can Benefit?
User Story Mapping is a versatile technique that helps many professionals contribute to and understand product development:
- Product Owners: Gain a comprehensive view of the product's scope, prioritize features based on user value, and communicate the product vision clearly to stakeholders and development teams.
- Portfolio Managers: Understand the strategic alignment of projects, visualize dependencies across initiatives, and make informed decisions about resource allocation.
- Business Analysts: Deconstruct complex requirements into manageable user stories, identify gaps, and ensure all user needs are captured and addressed.
- Scrum Masters & Agile Coaches: Facilitate collaborative sessions, promote shared understanding within teams, and help teams break down work into shippable increments.
- Development Teams: Understand the "why" behind their work, see how their individual tasks contribute to the larger user journey, and better estimate effort.
- Stakeholders: Get a clear, visual representation of the product's functionality, track progress, and provide informed feedback.
What is User Story Mapping?
At its core, User Story Mapping is a visual representation of the journey a user takes when interacting with a product or service. It organizes user stories - small, independent units of functionality described from the user's perspective - into a two-dimensional grid.
- Horizontally: It maps the sequence of user activities and steps, outlining the "backbone" of the user's journey.
- Vertically: It breaks down each activity into detailed user stories, ordered by priority, allowing for effective release planning.
This structure helps teams tell the whole product story, identify user pain points, discover missing functionalities, and prioritize work for incremental delivery.
Step-by-Step Guide
This guide outlines the fundamental steps to creating a user story map, regardless of the specific tool you use. The key is collaboration and visualization.
1. Define User and Goal
Every product serves a user, and every user has a goal. Start by identifying:
- The User Persona: Who is the user you are focusing on? Give them a name, define their characteristics, motivations, and pain points. (e.g., "Frequent Traveler Anne")
- Their Primary Goal: What is the overarching objective this user wants to achieve using your product? (e.g., "Book a flight seamlessly online")
Tools/Techniques: Whiteboard, sticky notes, shared document for persona definition.
2. Map Activities
Once you understand the user and their goal, break down their journey into high-level activities. These are the major steps a user takes to achieve their goal. Place these activities in chronological order across the top of your mapping space. This forms the "backbone" of your story map.
Example: For "Book a flight seamlessly online":
- Search for Flights
- Select Flight
- Enter Passenger Details
- Make Payment
- Receive Confirmation
Tools/Techniques: Large wall space, whiteboard, large sticky notes/cards for each activity.
3. Break Down Activities
For each high-level activity, identify the individual tasks or steps a user performs. Place these under their respective activity. These are more granular actions than the activities but still at a relatively high level.
Example: Under "Search for Flights":
- Enter origin/destination
- Select dates
- Specify number of passengers
- Apply filters (e.g., direct flights)
- View search results
Tools/Techniques: Smaller sticky notes/cards, different color for tasks.
4. Write User Stories
Now, for each user task, formulate specific user stories. A good user story follows the format: "As a [type of user], I want to [action], so that [benefit/goal]." These stories should be actionable, testable, and provide value to the user. Place these under their corresponding task/step.
Example: Under "Enter origin/destination":
- As a Frequent Traveler Anne, I want to type in the city name for my origin, so that I can quickly find my departure airport.
- As a Frequent Traveler Anne, I want to select a specific date from a calendar, so that I ensure I pick the correct travel day.
Tools/Techniques: Even smaller sticky notes/cards, or a distinct color. Each story should be concise.
5. Prioritize and Slice
Once you have a comprehensive map, begin the crucial step of prioritization and release planning.
- Prioritize Vertically: Within each column (under a task), arrange the user stories in order of importance, with the most critical/valuable at the top.
- Define "Walking Skeleton" (MVP): Identify the absolute minimum set of stories that would deliver a complete, end-to-end journey for the user – even if basic. This is your first release or Minimum Viable Product (MVP). Draw a line across the map to delineate this.
- Plan Subsequent Releases: Below the "walking skeleton," continue to draw lines to define future releases or iterations, grouping stories that add more functionality, polish, or cover edge cases. Each slice should represent a shippable increment of value.
Tools/Techniques: Horizontal lines (tape, drawing) to demarcate releases. Discussions and negotiation within the team.
6. Refine and Elaborate
User Story Mapping is an iterative and collaborative process.
- Refine Stories: As you discuss, you may need to split large stories, combine small ones, or add more detail.
- Add Detail: Include acceptance criteria, assumptions, and conversations around each story.
- Identify Dependencies: Note any technical or team dependencies.
- Collaborate: Continuously involve your development team, stakeholders, and other relevant parties in the discussions. The map should be a living document that evolves as understanding grows.
Tools/Techniques: Markers, pens for notes, discussions, regular team meetings around the map.
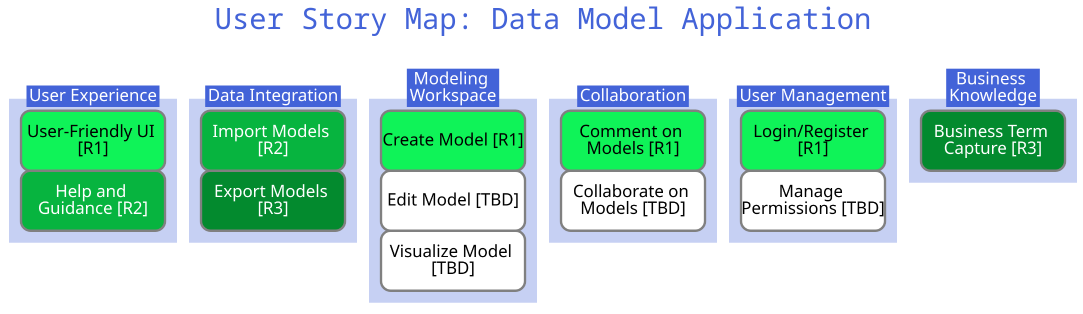
Use Termboard for User Story Maps
Termboard's User Story Map template helps you visualize and organize your project's user stories.
Open the example
To get started, you can open the example template in a couple of ways:
- Go to directly within Termboard.
- Click this link: Termboard demo.
Understanding the Template
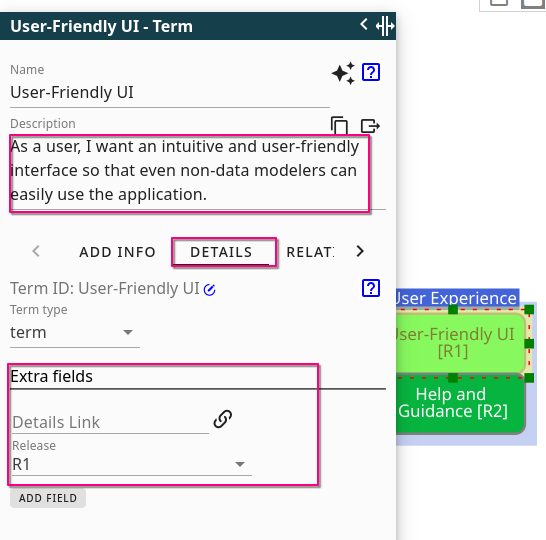
This template comes pre-configured with two useful Extra fields:
- Details Link: Use this field to add a URL for more information, such as a link to an epic in Jira.
- Release: This is a dropdown menu that lets you select a release (e.g., R1, R2). The boxes on your user story map will automatically change color based on the selected release, providing a quick visual overview.
You can customize these fields or add new ones to suit your needs. For more details on managing extra fields, see Edit Field.
The template includes predefined Activities (represented as Groups) and Features/User Stories (represented as the boxes). You have complete flexibility to modify, delete, or add new Activities and User Stories. You can also change or remove the title. Even if you remove all items, the extra fields will remain.
Start Your Own User Story Map
Once you're familiar with the example, press to create a new document based on this demo and begin building your own user story map.
Kick off with a prompt
Want an AI-generated user story map to get started quickly? Termboard features a specific User Story Map prompt within its AI chatbot. You can provide details about your application, and the AI will generate a user story map for you.
To learn how to use prompts, check out the documentation here.
Create New Elements
You can easily add new activities (groups) and stories (terms) to your user story map.
Activity (Group)
To create a new Activity:
- Right-click anywhere on the canvas.
- Select Add term from the context menu.
- Enter a name for your activity in the popup window.
- Choose
groupfrom the dropdown menu.
Story (Term)
To create a new Story:
- Follow the same steps as creating a group, but select
termin the dropdown menu. - You can provide a short description in the
Descriptionfield. If you want to add a more elaborate description with styling (rich text format), you can add it in theADD INFOtab. - You can fill in more details in the sidebar and the fields within the DETAILS section of the sidebar. The 'Release' extra field is a dropdown field where you can select your release.
- You can also add extra fields, for example if you want to store the Persona(s) this user story applies to. Click here on how to do this.
- Extra fields can also be used for filtering, for example you want to see the stories of a specific release or persona. Click here for more info.
Moving elements
Drag the Activities to the right position so that your user story map has a more or less logical order of Activities.
You can also drag the Stories into the Activities, and reorder them within an Activity. If you want to move several Stories down to make room for a new Story, select the Stories you want to move, then click and drag on one of the selected Stories.
You can also place a Story under an Activity or move to another Activity using the context menu. right-click on the Story and use the context menu to move it under the desired Activity (group). You can find more details on this process here.
TIP
If the boxes on your user story map appear too small, you have several options to adjust their size:
Adjust via Graph Styling: Select the boxes you want to resize, then use option
Ein the Graph Styling section to modify their dimensions.Enable Resizable Terms: Go to . Once enabled, you can directly resize individual boxes by dragging their edges.
Apply Style to Selected: To standardize the size of multiple boxes, select all the terms you wish to resize. Then, right-click on a box that already has your desired size. From the context menu, choose
Apply style to selected > Size. All selected boxes will now adopt the size of that reference box. :::
Share Your Story Map
Once you've created your user story map, you can easily share it with others.
You can save your map as a JSON file by going to . This file can then be shared with others who can open it in Termboard using .
Additionally, you have options to export your story map to Excel, PDF, or various image formats. For more information on export options, see here.