Appearance
Imports and Exports
Termboard provides a versatile set of options for bringing data into your graphs and sharing your work in various formats. These functionalities can be accessed via the menu: .
Import Options
When importing data into Termboard, you'll see an Import Options panel that lets you control how imported data interacts with your existing graph. Click the panel header to expand and configure these options.

Current Graph Mode
Controls what happens to your existing graph when importing:
| Mode | Icon | Description |
|---|---|---|
| Merge | + | Add new Terms/Relations and update existing ones. Your current graph remains intact. |
| Sync | ↻ | Add/update Terms, but also remove Terms that are not in the import file. Useful for keeping your graph synchronized with an external source. |
| Replace | 🗑 | Clear the entire graph first, then import. Use when you want a fresh start with new data. |
Duplicate Handling
When Merge or Sync mode is selected, you can also control how duplicates (terms with the same name) are handled:
| Option | Description |
|---|---|
| Update | Replace existing Term data with imported data |
| Skip | Keep existing Terms unchanged, discard imported duplicates |
| Allow | Create new Terms even if they have the same name as existing ones |
TIP
The collapsed panel header shows your current selection (e.g., "Merge & Update" or "Sync") so you can quickly see your import configuration.
Excel
Termboard offers two distinct methods for working with Excel files, depending on whether you want to preserve all Termboard-specific data (like positions and colors) or import/export data from/to standard Excel sheets,
To preserve all Termboard data, use the dedicated Excel file operations: .
For importing and exporting data from/to standard Excel spreadsheets that may not have been created by Termboard, use the import/export functions.
Import Excel
Selecting brings up the screen below.

When importing an Excel file, use the Import Options panel to control how the imported data interacts with your existing graph. The panel allows you to choose between Merge, Sync, and Replace modes, as well as how to handle duplicate terms.
After selecting an Excel file, a mapping window will appear.
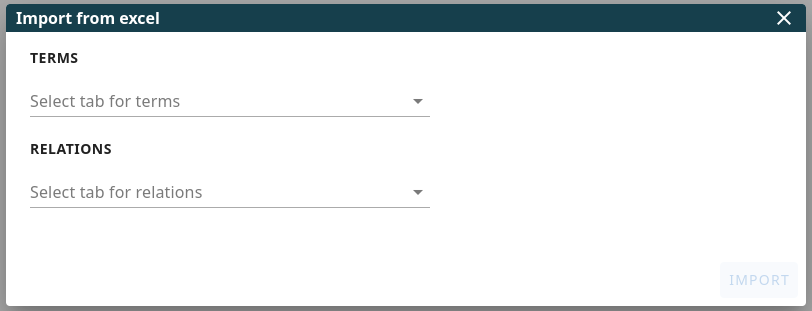
The import screen is divided into two sections: TERMS and RELATIONS. You can choose to import Terms, Relations, or both.
Once you select an Excel sheet for either TERMS or RELATIONS using the respective dropdown menu, additional fields will appear, allowing you to map columns from your Excel sheet to Termboard's data fields.
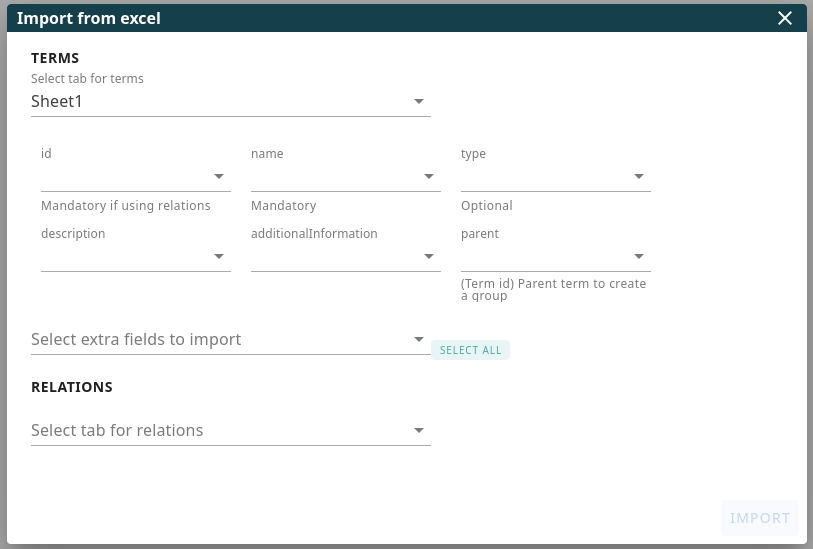
Mapping Excel Columns to Term Data
id: The unique identifier for each Term. This field is mandatory if you also intend to import Relations or want to update Terms which are already in the document. By omitting the id, new Terms will be created with the same name.
TIP
If the Term names in your Excel sheet are unique, you can select the column containing the Term names for this field.
name: The display name of the Term. You can select the same Excel column as you did for id. For Term name itself the column does not need to be unique: you can have multiple Terms with the same name, but it can be confusing in the graph
type: (Optional) Specifies the type of the Term (e.g., "term", "property"). Select the corresponding column from your Excel sheet.
description: (Optional) The detailed description of the Term. Map to the relevant column in your Excel file.
additionalInformation: (Optional) Allows you to import additional information for the Term, including HTML markup. Select the appropriate Excel column.
parent: (Optional) Use this field to establish hierarchical Relations between your Terms. Select the Excel column that contains the ID of the parent Term for each row. When imported into Termboard:
- The current Term will be visually placed inside the specified parent, which acts as a Group, creating a clear organizational structure.
- Important: If the ID specified in the "parent" column does not correspond to an existing Term (i.e., an ID defined in your 'id' column), Termboard will automatically create a new Term with that ID. This newly generated Term will then serve as the parent (Group) for the Term that referenced it. This ensures that all this Term is in a Group, even if the parent Term isn't explicitly defined elsewhere in your import.
Extra fields: Allows you to map additional columns from your Excel sheet to become extra fields associated with each Term in Termboard
Mapping Excel Columns to Relation Data
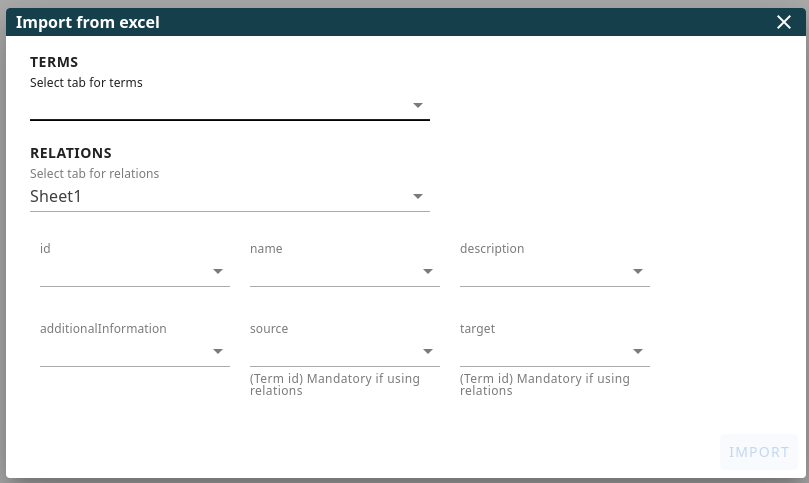
For Relations, you have similar basic fields: id, name, description, and Additional information (all optional). Additionally, you need to map the following columns to define the connections between Terms:
- source: Select the Excel column that contains the id of the Term that acts as the source (starting point) of the Relation. This can also be the Term's name if the names are unique (as defined in the id field for Terms).
- target: Select the Excel column that contains the id of the Term that acts as the target (ending point) of the Relation. Similar to the source, this can also be the unique Term name.
Once you have mapped the mandatory fields (specifically id for Terms if importing Relations, and source and target for Relations), the Import button will become enabled, allowing you to proceed with the data import.
Export Excel

This window allows you to configure how your Termboard data is exported to an Excel file.
- Sheet Names: Specify the names for the "Terms" and "Relations" sheets within the exported Excel file. The fields are pre-filled with "terms" and "relations" as defaults. If you leave either field blank, the corresponding data type (Terms or Relations) will not be included in the export.
- Column Mapping: Define the column headers for each data field you want to include in the respective Excel sheets. For example, entering "name" in the field corresponding to the Term name will create a column labeled "name" containing the Term names.
- Omitted Columns: Any column field you leave empty will not be included in the exported Excel sheet. This allows you to customize the exported data to your specific needs.
- Export Term types: This will only output the selected Term types. Mostly, only the types "term" and "property" are useful to export.
- RESET: will reset all fields to default values
Image
Termboard allows you to export your graph as an image in several common formats, making it easy to share your visualizations, embed them in documents like Word or PowerPoint, or use them in presentations.
Export Image
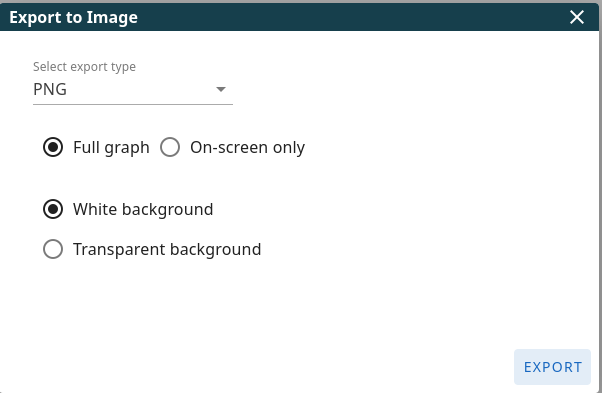
The following options allow you to customize your image export:
- Select export type: Choose the desired image format from the dropdown menu:
- PNG (Portable Network Graphics): A widely supported format that excels with graphics, diagrams, and text. It supports transparency and lossless compression, meaning no image quality is lost. Ideal for sharing online and in documents where image clarity is important.
- JPG (Joint Photographic Experts Group): A popular format for photographs and images with many colors. It uses lossy compression, which can reduce file size but may result in some loss of image detail, especially with sharp lines and text. Best for images where file size is a primary concern and subtle loss of quality is acceptable.
- SVG (Scalable Vector Graphics): A vector-based format, meaning the image is defined by mathematical equations rather than pixels. This allows you to scale the image to any size without loss of quality or pixelation. Ideal for diagrams, logos, and icons that may need to be resized frequently.
- Full graph / On-screen only: Determine which part of your graph to export:
- Full graph: Exports the entirety of your graph, even parts that are currently scrolled out of view. This is useful for capturing the complete overview of large diagrams.
- On-screen only: Exports only the portion of the graph that is currently visible within your Termboard window. This is convenient for quickly sharing a specific section of your work.
- White background / Transparent background: Choose the background color for your exported image:
- White background: Sets the background of the image to solid white. This is suitable for embedding in documents or platforms with light backgrounds.
- Transparent background: Makes the background of the image transparent (only supported by PNG and SVG formats). This is ideal for overlaying the image on other backgrounds without a visible white box.
TermStorm
You can use TermStorm to do a brainstorm workshop to get concepts to model from your SMEs
Import TermStorm
When you do the last step in TermStorm, you can copy the content, which you can paste in Termboard using this function. When you selected the Include user comments option in TermStorm, they will be added to ADD INFO of the term.
JSON
Termboard supports importing JSON files with a flexible, minimal structure. This feature is designed to make it easy to import data from various sources, whether you're creating new graphs or updating existing ones.
Import JSON
To import a JSON file, go to . You can either:
- Drag and Drop: Simply drag the JSON file directly onto the import dialog or Termboard canvas.
- Browse: Click the file selection area to browse your file system and select the desired JSON file.
Import Behavior
Use the Import Options panel to control how the imported data interacts with your existing graph. By default:
- Terms are matched by name (case-insensitive)
- Relations are matched by the combination of source, target, and name
- Auto-creates missing references: If Relations reference Terms that don't exist in your import file or current graph, those Terms will be automatically created.
Minimal JSON Structure
Termboard supports a very simple JSON structure. At minimum, you only need to provide term names:
json
{
  "terms": [{ "name": "Customer" }, { "name": "Order" }, { "name": "Product" }]
}
Or you can import only relations (terms will be auto-created if they don't exist):
json
{
  "relations": [
    {
      "source": "Customer",
      "target": "Order",
      "name": "places"
    }
  ]
}
All other fields are optional. You can add as much or as little information as you need.
Adding Relations
To create relationships between terms, add a relations array:
json
{
  "terms": [{ "name": "Customer" }, { "name": "Order" }],
  "relations": [
    {
      "source": "Customer",
      "target": "Order",
      "name": "places"
    }
  ]
}
Relations can reference terms either by their exact name (as shown above) or by ID if you've assigned IDs to your terms.
Adding Descriptions and Details
You can include additional information for your terms:
json
{
  "terms": [
    {
      "name": "Customer",
      "description": "A person or organization that purchases goods or services",
      "additionalInformation": "Also referred to as client or buyer", // (supports HTML)"
      "type": "concept" // possible values: term, concept, property
    }
  ],
  "relations": [
    {
      "source": "Customer", // Term Name
      "target": "Order", // Term Name
      "name": "places" // Relation name
    }
  ]
}
Available term fields include:
name- The term name (required)id- Unique identifier (auto-generated if not provided)description- Detailed descriptionadditionalInformation- Additional notes (supports HTML)type- Term type (term, concept, property, group, label)parent- Parent term for hierarchical grouping
For relations, you can add:
source- Source term name (required)target- Target term name (required)name- The relation name (required)description- Relation descriptionadditionalInformation- Additional notesrelationType- Classification (Generalization, Composition, Aggregation, etc.)cardinality- Target cardinality (e.g., "1", "0..1", "1..*")cardinalitySource- Source cardinality
Styling Terms and Relations
You can customize the appearance of terms and relations using the style object:
json
{
  "terms": [
    {
      "name": "Customer",
      "style": {
        "backgroundColor": "#E3F2FD",
        "borderColor": "#1976D2",
        "shape": "round-rectangle",
        "width": "120",
        "height": "50"
      }
    }
  ],
  "relations": [
    {
      "source": "Customer",
      "target": "Order",
      "name": "places",
      "style": {
        "lineColor": "#666666",
        "lineWidth": 2,
        "lineStyle": "solid"
      }
    }
  ]
}
You can also use the flattened format for styles:
json
{
  "name": "Customer",
  "style_backgroundColor": "#E3F2FD",
  "style_borderColor": "#1976D2"
}
Custom Fields (xFields)
You can add custom fields to your terms using the xFields_ prefix. These fields will be automatically created if they don't exist:
json
{
  "terms": [
    {
      "name": "Customer",
      "xFields_status": "active",
      "xFields_category": "premium"
    }
  ]
}
This will automatically create two extra fields: "status" and "category" that you can then use in your graph.
Complete Example
Here's a more comprehensive example showing many available features:
json
{
  "metadata": {
    "id": "ecommerce-model",
    "name": "E-commerce Terminology",
    "author": "Your Name",
    "description": "Basic e-commerce concepts and relationships"
  },
  "terms": [
    {
      "id": "T1",
      "name": "Customer",
      "description": "A person or organization that purchases goods or services",
      "type": "concept",
      "xFields_status": "Active",
      "style": {
        "backgroundColor": "#E3F2FD",
        "borderColor": "#1976D2"
      }
    },
    {
      "id": "T2",
      "name": "Order",
      "description": "A request to purchase products or services",
      "type": "concept"
    }
  ],
  "relations": [
    {
      "source": "T1",
      "target": "T2",
      "name": "places",
      "description": "Customer places an order",
      "relationType": "Interaction",
      "cardinality": "1..*"
    }
  ]
}
TIP
The JSON import feature is very flexible. You can start with minimal data and gradually add more fields as needed. You can also import the same file multiple times - existing items will be updated rather than duplicated.
TIP
For a complete reference of all supported fields and options, see the technical documentation included with Termboard.
JSON LD
JSON-LD (JavaScript Object Notation for Linked Data) is a standardized format for encoding Linked Data using JSON. It's designed to be both human-readable and easily processed by machines. JSON-LD enables you to create data that is interoperable and can be easily shared and integrated with other datasets on the Semantic Web. By providing context, JSON-LD allows applications to understand the meaning of the data, not just its structure.
TIP
Note: This section describes Termboard's proprietary JSON-LD format. For importing standard OWL ontologies in JSON-LD format, see the OWL Ontology section below.
- Export Term types: This will only output the selected term types. Mostly only the types "term" and "property" are useful to export.
Import JSON LD
To import a Termboard JSON-LD file, you can either:
- Drag and Drop: Simply drag the JSON-LD file directly onto the Termboard canvas or the designated import area.
- Select from Folder: Click the "Import" button and browse your file system to select the desired JSON-LD file.
WARNING
Termboard's JSON-LD import functionality is specifically designed to process files that have been previously exported from Termboard. Importing JSON-LD files from other sources may lead to unexpected results or errors. For standard OWL JSON-LD files, use instead.
Export JSON-LD (Termboard Format)
To export your current Termboard graph as a JSON-LD file, simply click the "Export" button within the JSON-LD import/export section. Termboard will generate a JSON-LD representation of your graph data, which you can then save to your local machine.
WARNING
Please be aware that the JSON-LD functionality in Termboard is currently experimental. For ongoing discussions and potential limitations, please refer to the Github discussion
HTML
Termboard allows you to export your graph as an interactive HTML file. This enables you to share your visualizations with others who can explore the graph directly in their web browser. By clicking on terms, viewers can access their definitions in a separate window, providing an engaging way to navigate and understand the information without needing Termboard itself.
Export HTML
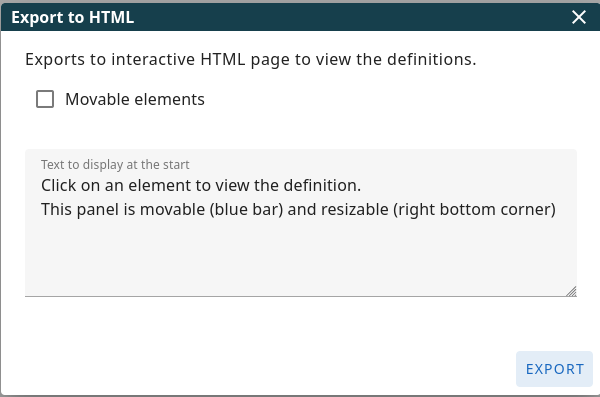
- Movable elements: If you check the Movable elements box, users viewing the exported HTML file will be able to click and drag the Terms around on the screen. This can enhance exploration and allow viewers to arrange the graph according to their preferences. The changes cannot be saved.
- Text to display at start: In this field, you can enter text that will be displayed when a user first opens the exported HTML file. This can be an introduction to the graph, instructions on how to interact with it, or any other relevant information you want to present upfront.
HTML (Launcher)
The HTML (Launcher) export creates a self-contained HTML file that acts as a "portable link" to your model. This is the most efficient way to share models or keep backups that can be opened with a single click.
Unlike the standard HTML export (which provides a read-only viewer), the Launcher is designed to bring your data back into a full instance of Termboard for further modeling.
How to use the Launcher
- Export: Go to .
- Share: Send the downloaded
.htmlfile to a colleague or store it as a backup. - Launch: Open the file in any browser. You will see a "Launch in Termboard" button.
- Load: Click the button. A new Termboard tab will open and, after a secure handshake, prompt you to load the model.
Security
The launcher uses the browser-native postMessage protocol. For security, Termboard will always ask for your confirmation before loading data from a launcher to ensure you don't accidentally overwrite your current workspace.
OWL Ontology
OWL (Web Ontology Language) is a family of knowledge representation languages for authoring ontologies. Ontologies are formal, explicit specifications of a shared conceptualization. OWL ontologies can describe the classes, properties, individuals, and data values within a domain and the relations among them. They are designed to be machine-interpretable and facilitate knowledge sharing and reasoning on the Semantic Web.
Termboard provides comprehensive support for importing and exporting OWL ontologies, with automatic mapping between OWL constructs and Termboard's visual modeling elements.
Import OWL
This feature enables you to import ontology files in standard OWL formats from resources like Ontobee, enabling you to visualize and work with existing semantic web ontologies.
Supported Formats:
- RDF/XML (.owl, .rdf, .xml) - Traditional OWL format
- Turtle (.ttl) - Human-readable text format
- JSON-LD (.jsonld) - JSON-based linked data format
Termboard automatically detects the format from the file content.
How OWL Maps to Termboard
When you import an OWL ontology, Termboard automatically converts OWL constructs into visual elements:
Understanding Termboard Types
Termboard uses a specific type system for semantic modeling:
- Concept - The main semantic entities (what OWL calls Classes)
- Property - Attributes of concepts (like "name", "age", "status")
- Term - Generic type for items that don't fit the above categories
When importing OWL ontologies, Classes become Concepts in Termboard. This allows Termboard's Semantic Checks to work properly with your imported ontology.
| OWL Construct | Termboard Element | Visual Appearance | Notes |
|---|---|---|---|
owl:Class | Term (type: concept) | Rectangle | Main concepts in your ontology |
rdfs:Class | Term (type: concept) | Rectangle | RDFS-only classes (no OWL) |
owl:NamedIndividual | Term (type: concept) | Rectangle | Instances of classes |
owl:ObjectProperty | Relation | Arrow between terms | Relationships between classes |
rdfs:subClassOf | Generalization Relation | Arrow with "is subclass of" label | Hierarchy/inheritance |
owl:DatatypeProperty | Extra Field (XField) | 1 line box | Attributes (optional import) |
Labels and Descriptions:
| OWL Property | Termboard Field | Description |
|---|---|---|
rdfs:label | Term Name | Primary display name |
rdfs:comment | Description | Term definition |
obo:IAO_0000115 | Description | OBO Foundry definition (preferred over rdfs:comment) |
skos:altLabel | Synonyms | Alternative names |
Advanced Features (v1.6+):
| OWL Feature | How It's Imported | Use Case |
|---|---|---|
owl:inverseOf | Tracked as metadata | Understanding bidirectional properties (e.g., maker ↔ made) |
owl:FunctionalProperty | Marked as functional | Properties that can only have one value (e.g., age, email) |
owl:DeprecatedClass | Marked as deprecated | Obsolete classes to avoid using |
owl:DeprecatedProperty | Marked as deprecated | Obsolete properties to avoid using |
Label Generation
Termboard automatically generates human-readable labels from OWL URIs when rdfs:label is not provided:
| URI Fragment | Generated Label |
|---|---|
givenName | Given Name |
family_name | Family Name |
mbox_sha1sum | Mbox Sha 1sum |
currentProject | Current Project |
CamelCase and snake_case are automatically converted to Title Case for better readability.
How to Import
Download an ontology file: Obtain an OWL file from repositories like:
- Ontobee - Life sciences ontologies
- BioPortal - Biomedical ontologies
- LOV (Linked Open Vocabularies) - General vocabularies
- Or use the included test file:
TEST/foaf-simple.rdf(FOAF ontology)
Import the file: Go to
- Drag and drop the file, or
- Use the file selection dialog
Configure import options: Choose what to import:
- Import classes - Main concepts (recommended: ✓)
- Import individuals - Instances (optional)
- Import object properties - Select which relationships to include
- Map data properties to XFields - Import attributes as custom fields
Choose import mode: Use Import Options to control:
- Merge - Add to existing graph
- Replace - Start fresh
- Duplicate handling - Update, skip, or allow duplicates
Example: FOAF Ontology
FOAF (Friend of a Friend) is a popular ontology for describing people and relationships. When imported into Termboard:
Classes become Terms (type: concept):
foaf:Agent→ Term "Agent" (type: concept)foaf:Person→ Term "Person" (type: concept, with "is subclass of" relation to Agent)foaf:Organization→ Term "Organization" (type: concept)
Properties become Relations:
foaf:knows→ Relation "knows" connecting Person to Personfoaf:member→ Relation "member" connecting Agent to Group
Data Properties (optional XFields):
foaf:name→ XField "name"foaf:mbox→ XField "personal mailbox" (functional property - can only have one value)foaf:age→ XField "age" (functional property)
TIP
While importing, check the WebVOWL-style visualization option visualization style for an ontology-optimized view with color-coded nodes by type!
Best Practices
For Best Results:
- Import ontologies with fewer than 2000 classes for optimal performance
- Use ontologies with clear
rdfs:labelannotations - Check for namespace conflicts with existing terms before importing
- Review object properties in the preview step - uncheck unwanted relationships
Common Use Cases:
- Domain modeling - Import industry-standard ontologies (e.g., Schema.org, FIBO) as starting points
- Standards compliance - Ensure terminology aligns with accepted vocabularies
- Knowledge integration - Combine multiple ontologies with your custom terms
- Educational - Learn semantic web concepts by exploring real ontologies
WARNING
Important Notes:
- Complexity: Highly complex OWL constructs (property chains, complex restrictions) are simplified during import
- Size limits: Ontologies over 2000 classes may cause performance issues
- RDFS vs OWL: Both pure RDFS and OWL ontologies are supported (v1.6+)
- JSON-LD formats: - Standard OWL JSON-LD → Use
TIP
Need Help?
- Have issues importing a specific ontology? Report it via
- Test with the included FOAF sample file first to verify everything works
Export OWL
Termboard can export your graph to standard OWL formats, enabling full round-trip capability between Termboard and OWL ontology tools like Protégé. This allows you to use Termboard as a visual ontology editor and share your work with other semantic web tools.
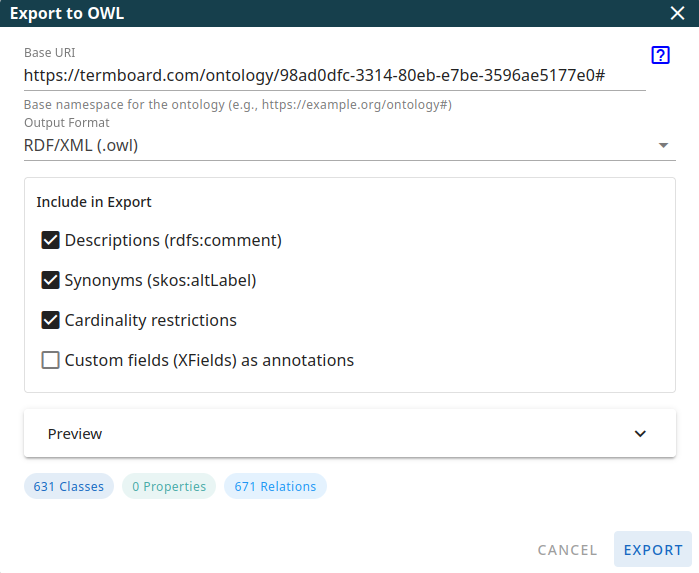
To export your graph as OWL, go to .
Export Options
Base URI: The namespace URI for your ontology (e.g.,
https://example.org/myontology#). This URI will be used as the base for all class and property URIs in the exported file. By default, Termboard generates a URI based on your document ID.Output Format: Choose between three standard RDF serialization formats:
- RDF/XML (.owl): The traditional OWL format with wider tool compatibility. This is the default format.
- Turtle (.ttl): A more human-readable text format that's easier to read and edit manually, and works better with version control systems.
- JSON-LD (.jsonld): A JSON-based format that combines the simplicity of JSON with the power of linked data. Easy to process with standard JSON tools.
Include Options
Control what information is included in the export:
- Descriptions (rdfs:comment): Include term descriptions as
rdfs:commentannotations on each class - Synonyms (skos:altLabel): Include term synonyms as
skos:altLabelannotations - Cardinality restrictions: Export cardinality information as OWL restrictions (e.g.,
owl:cardinality,owl:minCardinality,owl:maxCardinality) - Custom fields (XFields) as annotations: Include your custom extra fields as OWL annotation properties
How Termboard Exports to OWL
When you export, Termboard converts your visual model back into standard OWL:
| Termboard Element | Exported as OWL | Notes |
|---|---|---|
Term (type: concept) | owl:Class | Main classes in your ontology |
Term (type: term) | owl:Class | Generic terms also exported as classes |
Term (type: property) | owl:ObjectProperty | Named property declaration |
| Generalization Relation | rdfs:subClassOf | Preserves hierarchy structure |
| Composition Relation | owl:Restriction with owl:someValuesFrom | Part-whole semantics |
| Other Relations | owl:ObjectProperty + domain/range | Custom relationships |
| Term Name | rdfs:label | Always included |
| Description | rdfs:comment | If "Include descriptions" checked |
| Synonyms | skos:altLabel | If "Include synonyms" checked |
Cardinality 1 | owl:cardinality 1 | Exact cardinality |
Cardinality 0..1 | owl:maxCardinality 1 | Maximum cardinality |
Cardinality 1..* or 1..n | owl:minCardinality 1 | Minimum cardinality |
| Extra Fields (XFields) | owl:AnnotationProperty | If "Include XFields" checked |
TIP
Round-trip Compatible: You can import an OWL file, edit it in Termboard, and export it back to OWL. The structure and semantics will be preserved, though some visual elements (colors, positions) are Termboard-specific and won't be in the exported OWL.
TIP
The export dialog includes a Preview panel where you can see the generated OWL output before downloading. Click on "Preview" to expand it and verify the export looks correct.
TIP
Group nodes are not exported to OWL, as they represent visual organization rather than semantic concepts. Only terms, concepts, and properties are included in the export.
SKOS Vocabularies
SKOS (Simple Knowledge Organization System) is a W3C standard for representing taxonomies, thesauri, classification schemes, and controlled vocabularies. Termboard provides full SKOS support through the same OWL import/export dialogs.
Why Use SKOS?
SKOS is purpose-built for the exact use cases Termboard serves:
- Perfect semantic fit: SKOS concepts, hierarchies, and associative relations align naturally with Termboard's terminology model
- Industry standard: Widely adopted for controlled vocabularies (UNESCO Thesaurus, Library of Congress Subject Headings, etc.)
- Simpler than OWL: Focused vocabulary for concept management, not formal reasoning
- Rich labels:
skos:prefLabel,skos:altLabel, andskos:hiddenLabelsupport multiple ways to name concepts
SKOS Import
SKOS files are imported via . Termboard automatically detects SKOS constructs.
| SKOS Construct | Termboard Element | Notes |
|---|---|---|
skos:Concept | Term (type: concept) | Becomes a concept node |
skos:ConceptScheme | Term (optional) | Organizational structure |
skos:broader | Generalization relation | Parent relationship |
skos:narrower | (skipped) | Inverse of broader |
skos:related | Association relation | Symmetric relationship |
skos:prefLabel | Term name | Primary label |
skos:altLabel / skos:hiddenLabel | Synonyms | Alternative labels |
skos:definition | Description | Primary definition |
skos:note / skos:scopeNote / skos:example | Description (appended) | Additional notes |
Import Options:
- Import SKOS concepts as terms (default: enabled)
- Import concept schemes (default: disabled)
- Prefer SKOS labels over RDFS labels (default: enabled)
SKOS Export
When exporting, choose the Vocabulary Style option:
| Style | Description | Best For |
|---|---|---|
| OWL (default) | owl:Class and rdfs:subClassOf | Formal ontologies, reasoning |
| SKOS | skos:Concept and skos:broader/narrower/related | Taxonomies, thesauri, vocabularies |
| Both | Dual vocabulary | Maximum interoperability |
Export Mapping:
- Generalization →
skos:broader(child → parent) +skos:narrower(parent → child) - Association/Aggregation/Interaction/Other →
skos:related(symmetric) - Composition → Kept as
owl:ObjectProperty
TIP
Use SKOS vocabulary style when exporting controlled vocabularies or taxonomies that will be used in enterprise systems, tagging applications, or knowledge graphs.
PDF
The PDF export feature allows you to create a comprehensive document of your Termboard graph, bundling the visual representation with detailed information about your terms and relations. This is an ideal way to share your entire project in a single, easily distributable file.
Export HTML/PDF
The image above indicates that the document information is currently not set. While providing this information is optional, it enhances your PDF by including a cover page with the document's Name, Description, and an optional Image. You can set this information via or press the "SET DOCUMENT INFO" button.
By pressing the OPEN HTML button it will navigate to a new browser tab, where the HTML version is displayed, which you can then save to PDF using the browser Print... functions.
By pressing the SAVE AS HTML button, it will download a HTML version.
Customize your PDF export by selecting the following elements:
- Cover Page: Include a cover page at the beginning of the PDF, featuring the document's name, description, and author (if provided in the Document Properties).
- Cover Page Image: Add an image as a background to the cover page for a more visually engaging presentation (as provided in the Document Properties).
- White text background: When using a cover page image, this option adds a white background behind the text on the cover page, improving readability.
- Graph: Embed a visual representation of your Termboard graph as a page in the PDF document.
- Do not display relation names: When the graph becomes too complex/large it can help to hide the relation names in the graph. See (graph isssues)[#Graph-export-issues]
- Terms with description: Include a table listing all terms which have a description.
- Terms without description: Also include terms without descriptions in the table.
- Relation details: Include detailed information for relations, including descriptions, types, and Extra Fields.
- Export only selected items: If you have specific terms or relations selected in your graph, enabling this option will export only those selected elements (also reflected in the exported graph).
Further customize the layout and content of your PDF using these options:
- Landscape or Portrait: Choose the orientation of the pages in your PDF document:
- Landscape: Prints the content with a wider page orientation, often suitable for wider graphs.
- Portrait: Prints the content with a taller page orientation, the standard document layout.
- Table (simple): Presents the definitions (name, description) of your terms in a straightforward table format.
- Sections (advanced): Generates a dedicated section for each term in your graph, offering more granular control over the included information. Within the "Sections" option, you can further select to include:
- Table of contents of the terms: Adds a table of contents at the beginning of the term sections, allowing for easy navigation.
- The Graph will be clickable so you can navigate to the term. This works in HTML and the PDF formats. See Issues
- A Hierarchy tree view of the terms: Adds a collapsable tree view (HTML) of static tree view of the expanded state (PDF)
- Relations per term: Lists all the incoming and outgoing relations for each term within its respective section. Relation names are clickable and navigate to their respective details.
- Additional information: Includes the formatted "Additional information" content associated with each term.
- Pagebreak after term: Starts each term's section on a new page, improving organization for documents with extensive term details.
- Relation sections: In "Sections (advanced)" mode, each relation also gets a dedicated detail page including its source, target, type, description, and custom fields.
Graph export issues
The graph can become too large to have it clickable, or even display at all. You can:
- Select do not display Relation names in Graph
- Make the document on a subset of the graph (Export only selected Terms)
Powerpoint
Termboard allows you to export your graph directly into PowerPoint format, providing a convenient way to integrate your visualizations into your presentations. Alternatively, you can also export the graph as an image and insert it into your slides.
Export Powerpoint
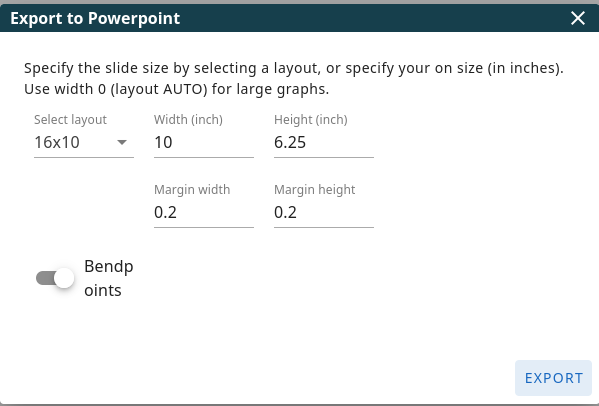
The following options allow you to customize your PowerPoint export:
- Layout: Choose from a range of built-in slide aspect ratios and sizes:
- 16x10, 4x3, WIDE: Standard widescreen and traditional presentation formats.
- A3, A4: Standard paper sizes, useful if you intend to print the slides as well.
- AUTO: Automatically adjusts the slide size to attempt to fit the entire graph within a single slide. This is particularly useful for large graphs.
- Use AUTO for large graphs: As noted above, selecting "AUTO" is recommended for graphs that extend beyond the boundaries of standard slide sizes.
- Custom page size and margins (inches): If the built-in layouts don't meet your needs, you can define a custom slide width and height, as well as the margins around the graph on the slide, all measured in inches.
- Bendpoints: If your relations have bendpoints (intermediate points to adjust the path), these will be preserved in the exported PowerPoint. When this is disabled, all relation lines will be rendered as straight lines connecting the source and target terms, regardless of any bendpoints in your Termboard graph. Control points (curved lines) are not supported in PowerPoint export. If you require curved relation lines, please use the Image Export functionality, which will capture the visual representation exactly as it appears in Termboard.
RFP/RFI Document
Generating professional, hierarchically structured requirements matrices for vendor communication or analytical review. This feature is available only when the Business Analysis profile is active.
- Dual-Mode System: Supports both clean External Supplier Mode (with optional vendor response columns) and detailed Internal Review Mode (with multi-scenario comparisons).
- Format: Optimized HTML for perfect "Print to PDF" layout using standard browser tools.
For a full step-by-step guide on configuration and usage, please refer to the Business Analysis Guide.