Appearance
Right sidebar
In the right sidebar you can find several tools which are selectable via
Header controls

- A Collapse/Resize: Resize the sidebar or collapse the sidebar
- B Select Tool: Pick another tool
- C Close sidebar: Closes the sidebar
Arrange Automatically
You can select this tool via
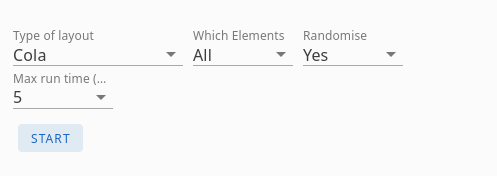
This tool has several ways to layout your graph.
- Type of layout: Select a way to display the terms in the graph, try them out to see which fits your needs best
- Which Elements: Apply this layout to all elements (terms and relations) or only the selected terms
- Randomise: If set to Yes, first the graph is randomised, so it is recalculated completely, ir set to No it will use the current positions to apply the layout
- Max run time: The time in seconds to run the layout. Longer results in better results with large graphs. If you have thousands of elements then 60 seconds might not be enough, you can continue by setting Randomise to No, and rerun the layout
- Direction: Only applicable for the Hierarchy layout. It sets the direction it is displayed. (up-down, left-right)
Add in Bulk/Chatbot
You can select this tool via
This feature lets you create a prompt that is copied to your clipboard. You can then paste this prompt into a chatbot. The chatbot's response can be copied and pasted back into the input fields here, allowing for the automatic addition or updating of terms and relations.
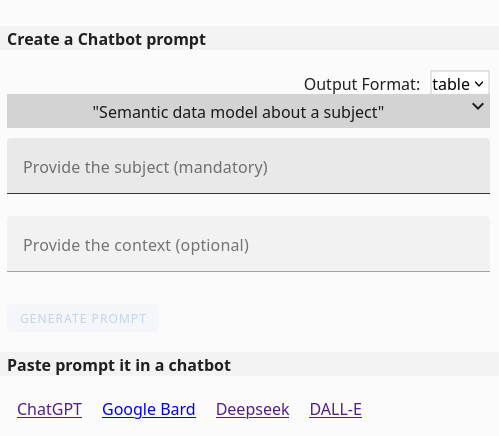
Create a Chatbot prompt
This will generate the prompt.
- Output Format: Choose the format in which the chatbot will generate its response.
- table: he chatbot will provide its output as one or two tables (one for terms and one for relations). This allows you to review and modify the data in a spreadsheet program like Excel before importing it back into TermBoard. Simply paste the table(s) into Excel, make your desired changes, and then copy and paste the adjusted table(s) into the appropriate input fields within the "Bulk add terms and relations" section. Ensure you paste the terms table into the terms input and the relations table into the relations input.
- JSON: The chatbot will generate its response as a JSON string containing terms and/or relations. This JSON string can be directly pasted into the designated JSON input box.
- Provide information: Based on the prompt you've chosen, you'll see additional input fields:
- Provide the subject: This field is mandatory for this prompt. Specify the core topic for which you want the prompt to generate information. For example, entering "Car" will instruct the chatbot to create a semantic data model related to cars.
- Provide the context: This field is optional. If the chatbot's initial response is too general, you can provide more specific context here. For instance, you could enter "Retail sales" to focus the data model on car sales rather than car parts in general.
- Paste your text: This field will only be visible if you've selected a prompt that requires text analysis. Here, you can paste the specific text that you want the chatbot to process and extract information from.
- GENERATE PROMPT: Press this button to generate the prompt. It is automatically added to the clipboard.
Paste prompt in a chatbot
- This gives some handy links to different chatbots. Pick your favorite chatbot and paste the value from you clipboard (CTRL-V) into it and wait for the response
Bulk add terms and relations:
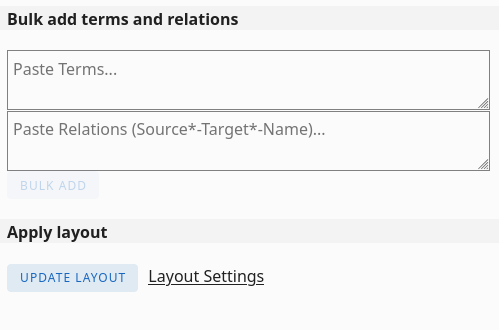
- Paste the chatbot's response here. When using the "table" Output Format, select only the term table and paste it into the "Terms" box, and the relation table into the "Relations" box.
- You can customise the order of the relation columns for bulk adding via . Ensure you configure this order before clicking the "GENERATE PROMPT" button in the preceding step.
- If you chose "JSON" as the Output Format, a single input box will be displayed where you can paste the entire JSON response from the chatbot, simplifying the process.
TIP
This section can also be used for quickly adding or updating terms and relations manually. When "table" Output Format is selected, simply paste or type a few terms and their details into the "Terms" box, and similarly for relations in the "Relations" box.
Table Format requirements:
- Terms: Must include a "Name" column. Optionally, you can also include "Description" and/or "Additional information" columns.
- Relations: Must include "Source", "Target", and "Name" columns. "Source" and "Target" should contain the exact names of the terms involved in the relation.
- In both cases, do not include the column names otherwise they will also be added as terms or relations
- Ensure each term and relation occupies a new line, or use "\n" to indicate a line break.
- Columns can be separated by a Tab character, pipe ( | ), semicolon ( ; ), colon ( : ), or comma ( , ). It will auto detect the used separator.
JSON format requirements:
- The format should be: {"terms":[{"name", "description", "explanation"}], "relations":[{"source", "target", "name", "explanation"}]}
- All objects are optional
Filter and Select
Here you can filter the graph based on Field or Relations.
You can select this tool via
Filter on Fields
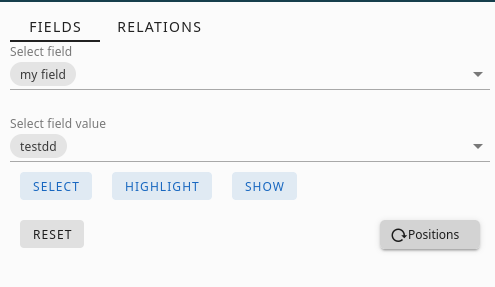
By selecting the FIELDS tab at the top, you'll access the Field Selector screen. Please note that you need to have created one or more Fields beforehand.
- Select field: A dropdown menu allowing you to choose from the Fields you have previously created.
- Select field value: A multi-select where you can pick one or more specific values associated with the field chosen in the "Select field" dropdown.
- SELECT: Clicking this button will select all terms within your graph that have the field value(s) you've chosen.
- HIGHLIGHT: Pressing this button will visually emphasize the terms that possess the selected field value(s), while dimming or blurring the remaining terms in the graph for better focus.
- SHOW: This button will hide all terms in the graph that do not have the field value(s) you have selected, displaying only the relevant terms.
- RESET: Clicking this button will undo the effects of the SELECT, HIGHLIGHT, or SHOW actions, returning the graph to its previous state with all terms visible and unselected.
- Positions: This button will trigger a re-arrangement of the currently visible terms in the graph to optimize the layout.
Filter on Relations
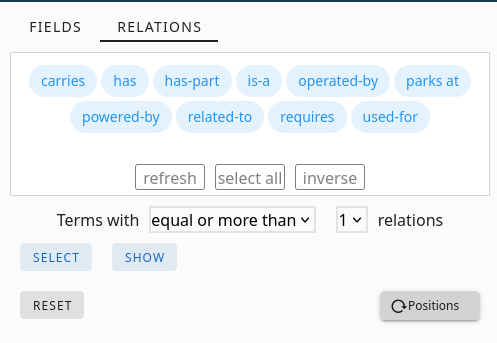
By selecting the RELATIONS tab at the top, you'll be taken to the Relations Selector screen. Here, you'll see a list of all the relations present in your graph, which you can click to toggle their selection (indicated by a blue colour).
- refresh: Updates the list of relations. This is useful if you have this sidebar open and are simultaneously making changes to relations directly within the graph.
- select all: Selects every relation in the list (all will turn blue).
- inverse: Reverses the current selection of relations. Deselected relations will be selected, and vice versa.
- Terms with [compare] [amount] relations: This section allows you to filter and select terms based on a comparison (equal, equal or more, equal or less) applied to the number of relations they have. You'll need to specify the comparison operator and the amount.
- SELECT: Once you've defined the criteria in the "Terms with [compare] [amount] relations" section, clicking this button will select the terms that meet those criteria.
- SHOW: Similar to "SELECT," but instead of just selecting the terms, this button will display only the terms that meet the criteria defined in the "Terms with [compare] [amount] relations" section, hiding all other terms in the graph.
- RESET: Clicking this button will undo the effects of the SELECT, or SHOW actions, returning the graph to its previous state with all terms visible and unselected.
- Positions: This button will trigger a re-arrangement of the currently visible terms in the graph to optimize the layout.
Find Path
Finds the shortest path between 2 terms, based on a criteria you provided.
You can select this tool via
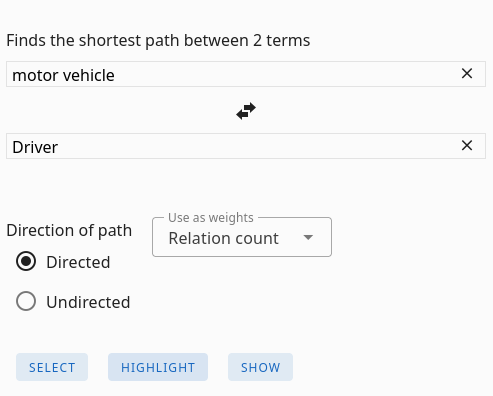
- From name: A search field where you can enter the name of the term you want to be the starting point of your path.
- ↔️ (Swap Arrows): Clicking these back and forward arrows will reverse the roles of the "Type To name" and "Type From name" terms, effectively changing the direction of your pathfinding.
- To name: A search field where you can enter the name of the term you want to be the end point of your path.
- Direction: Specifies whether the pathfinding should consider the direction of the relations.
- Directed: Only paths where all relations point from the source term towards the target term (following the arrow direction) will be considered.
- Undirected: The direction of the relations does not matter; the path can traverse relations in either direction.
- Use as weights: Determines how the "shortest" path is calculated:
- Relation count: The path with the fewest number of relations between the "From" and "To" terms will be selected as the shortest.
- Relation weight: The path where the sum of the weights of all relations along the path is the lowest will be selected as the shortest.
- Term weight: The path where the sum of the weights of all terms along the path (excluding the starting term) is the lowest will be selected as the shortest.
- SELECT: Clicking this button will select the shortest path
- HIGHLIGHT: Pressing this button will visually emphasize the shortest path, while dimming or blurring the remaining terms and relations in the graph for better focus.
- SHOW: This button will hide all terms and relation in the graph that do not being in the shortest path, displaying only the relevant terms and relations
Hierarchy View
The Hierarchy View displays the relationships between terms in a condensed, tree-like structure. It also provides the functionality to modify these relationships by dragging and dropping terms within the tree.
You can select this tool via

Search term: An input field where you can type the name of a term. The view will navigate to and highlight the matching term within the tree.
Relation type: A dropdown menu allowing you to select a specific relation type. The tree view will then be constructed based on the relations with this chosen relation type.
Arrows up/down: These buttons control the direction in which the hierarchy is displayed:
- Up: The target term (the "to" end of the relation) is positioned at the top of the tree, with all the source terms (the "from" ends) branching out below it as expandable nodes.
- Down: This reverses the direction, placing the source term at the top and the target terms as expandable children.
Within the tree structure:
- Clicking on the arrow icon left of the term will expand or collapse its direct children (terms connected by the selected relation type).
- Clicking directly on a term's name will open a context menu with the following options:
- Popout Description: Opens a small, separate window displaying the definition of the selected term. This is useful for quickly comparing the definitions of different terms without losing your place in the hierarchy.
- Goto term: Navigates the main graph view to the selected term and simultaneously opens the term's details in the left sidebar.
- Move to: This option allows you to change the relationships of the selected term by dragging and dropping it onto another term in the tree. For more detailed instructions, refer to the section on Moving a term.
Moving a term
To move a term within the Hierarchy View, follow these steps:
Initiate Move: Click on the term you wish to move in the tree. From the context menu that appears, select "Move to..". The name of the term you are moving will now be displayed near your mouse cursor as you navigate.
Locate Target: Either use the "Search term" input field to find the term you want to place the moving term under, or navigate through the tree structure to locate it.
Complete Move: Once you have found the target term, click on its name in the tree. In the context menu that appears for the target term, select "Move under". This will change the relation, placing the term you were moving as a child (based on the selected "Relation type") of the target term.
Move to Root (Optional): If the term you are moving is not already at the top level of the hierarchy (the root), the context menu for that term will also include the option "Move to root". Selecting this will detach the term from its current parent and place it at the root level of the tree. This will remove the relation this term had.
Important Considerations:
- Relation Modification: Moving terms within the Hierarchy View directly alters the underlying relations in your graph. Specifically, either the source or the target term of the relevant relation will be updated to reflect the new hierarchical structure.
- Selecting Relation Type on Move: If you move a term from the root level to another term, and there are multiple relation names defined for the "Relation type" you have selected for the Hierarchy View, a pop-up window will appear. This prompt will ask you to choose the specific relation name you want to use to establish the new connection between the moved term and its new parent.
Semantic checks
Here you find several checks on the terms and relations. These checks are mainly focussed on Semantic Modeling, but can be used of other types of graphs as well.
You can select this tool via
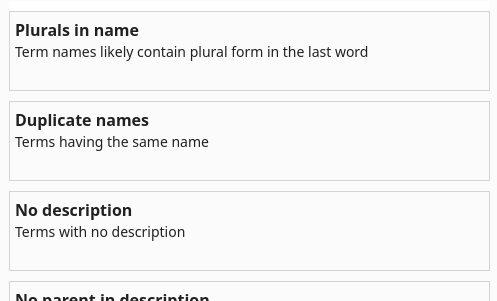
Plurals in name
Lists all term names which are in plural form.
While there might be rare exceptions or specific modeling methodologies that allow for plural terms in certain contexts, the general consensus in semantic modeling favors singular term names for the reasons mentioned below. It promotes a cleaner, more consistent, and less ambiguous representation of your domain knowledge:
Focus on the Concept: Singular terms tend to represent a distinct concept or entity. When you use "Customer" instead of "Customers," you're directly referring to the idea of a customer, with its inherent properties and relationships. This makes the model more abstract and focused on the fundamental building blocks of your domain.
Avoid Ambiguity: Plural forms can sometimes be ambiguous. Does "Products" refer to the general concept of a product or a specific collection of multiple product instances? Using the singular "Product" clearly denotes the concept itself. When you need to represent multiple instances, you typically do so through relationships (e.g., a "Customer" has many "Order" instances).
Consistency and Predictability: Employing singular forms creates a more consistent and predictable modeling style. Once this convention is established, it becomes easier for everyone working with the model to understand the meaning of terms and to create new ones following the same pattern.
Alignment with Instance Representation: In many data storage and programming contexts, you'll often deal with individual instances of entities. Using singular terms in your model aligns better with how you'll likely represent these individual records or objects (e.g., a single customer record, a single product object).
Easier Relationship Naming: Singular terms often lead to more natural and readable relationship names. For example, "Customer places Order" is clearer than "Customers place Orders."
Reduced Redundancy: When defining properties or attributes of a term, you're describing characteristics of a single instance. It feels more natural to say a "Product has a Name" rather than "Products have a Name."
Think of your semantic model as a vocabulary for describing your domain. Just as you define the meaning of a single word, you define the meaning of a single concept. You then use relationships to express how multiple instances of these concepts interact.
Duplicate names:
Lists all terms which have duplicate names.
Unique term names are fundamental for creating a clear, consistent, and unambiguous representation of your domain. They ensure that everyone using the model is speaking the same language and that the model can be used effectively for reasoning, integration, and communication. It's a basic principle that underpins the usefulness and reliability of any semantic model. Here's why duplicate term names are problematic:
Confusion and Ambiguity: If you have two different terms with the same name, it becomes impossible to know which concept is being referenced in any given context. This leads to misinterpretations, errors in reasoning, and difficulties in communication among those using the model. Imagine trying to discuss "Account" when it could refer to a user account or a financial account – the conversation would quickly become muddled!
Hindrance to Logical Reasoning: Semantic models are often used for logical inference and querying. If term names are not unique, it becomes incredibly difficult to formulate precise queries or to draw accurate conclusions from the relationships defined within the model. The system wouldn't be able to distinguish between the two identically named concepts.
Data Integration Challenges: When you try to map your semantic model to underlying data sources, duplicate term names create significant challenges. How do you know which database table or data field corresponds to which concept in your model if they share the same name? This complicates data integration and interoperability.
Tooling and Technology Limitations: Many semantic modeling tools and technologies rely on unique identifiers for terms. Duplicate names can cause errors, warnings, or unexpected behavior within these systems.
No description:
Lists all terms which do not have a description.
The descriptions/definitions provide the crucial context and detail that term names alone often lack. Here's why they are so important:
Clarity and Precision: While term names aim for conciseness, descriptions provide the space to elaborate on the exact meaning of a term. They can clarify nuances, specify boundaries, and distinguish a term from other similar concepts. For example, you might have a term named "Customer Status" but the can be many interpretations for it.
Shared Understanding: Descriptions act as a central point of reference, ensuring that everyone working with the model has the same understanding of what each term represents. It reduces the risk of misinterpretations and promotes consistent usage of terminology.
Contextualization: A term's meaning can be heavily influenced by the context of the domain being modeled. Descriptions allow you to capture this context, explaining how a term is used and understood within that specific domain. For instance, the term "Lead" might have different meanings in a sales context versus a manufacturing context. The description can clarify the intended meaning within your specific model.
Resolving Ambiguity: Even with singular and unique term names, there can still be potential for ambiguity. A well-written description can explicitly address and resolve these ambiguities, leaving no room for doubt about the intended meaning of a term.
Facilitating Model Evolution: As the domain evolves, the meaning of certain terms might also need to be updated or refined. The description provides a place to document these changes and ensure that the model accurately reflects the current understanding of the domain.
No parent in description:
Lists all terms which have a Generalisation relation with a parent term, but that parent term is not mentioned in the definition.
Mentioning the parent term in the definition is a powerful technique for building well-structured, understandable, and logically sound semantic models. It leverages the power of hierarchical relationships to organize knowledge effectively:
Establishing a Clear Hierarchy and Context: By stating the parent term, you immediately position the current term within a broader classification. This establishes a clear "is-a" relationship and provides essential context for understanding the term's fundamental nature. For example, defining "Sedan" as "a type of Car" immediately tells us that a sedan inherits all the general characteristics of a car.
Improving Understandability and Navigation: Explicitly stating the parent term makes the model easier to understand and navigate. Users can quickly grasp the relationship between different concepts and traverse the hierarchy to find related terms. It creates a more intuitive and organized structure.
Supporting Logical Reasoning and Inference: When parent-child relationships are clearly defined through definitions, it enables logical reasoning and inference within the model. For example, if we know "Sedan is a type of Car" and "Car has four wheels," we can infer that "Sedan has four wheels."
Ensuring Consistency and Avoiding Redundancy: By anchoring a term to its parent in the definition, you reinforce the established hierarchy and reduce the risk of defining contradictory or redundant properties and relationships for the child term.
Duplicating parent relations:
This lists all terms which have the same relation(s) as one of the parents.
Avoiding the explicit duplication of parent relations in child terms is a key principle for creating efficient, maintainable, and semantically clean models. While a child term inherits the parent's relations in a hierarchical structure, explicitly stating the same relations on the child term leads to several drawbacks:
Redundancy and Increased Complexity: Explicitly listing the same relations on both the parent and the child term introduces unnecessary redundancy. This makes the model larger and more complex to read and understand. It clutters the definition of the child term with information that is already implicitly understood through the parent-child relationship.
Maintenance Overhead: If a relation of the parent term needs to be updated (e.g., its cardinality changes, or it's renamed), you would also need to remember to update it on every child term where it was explicitly duplicated. This significantly increases the maintenance burden and the risk of inconsistencies if you forget to update all the instances.
Reduced Clarity of Specialization: The primary purpose of creating child terms is to represent more specific concepts that specialize the parent concept. If a child term simply repeats all the parent's relations, it doesn't clearly highlight the unique relationships that define its specialization. The focus should be on the relations that are specific to the child term or where the child term participates in a relation with different constraints or characteristics.
Instead of duplication, the focus should be on:
- Inheritance: Leveraging the inherent hierarchical relationship so that child terms automatically inherit the relations of their parents. (more info soon...)
- Specialization: Defining only the relations that are unique to the child term or where the child term has a different behavior or constraints compared to the parent.
- Overriding (with caution): In some advanced modeling scenarios, a child term might override a parent's relation with a more specific definition or constraint. This should be done judiciously and with clear justification. This is feature is not supported by Termboard
Multi parent
This lists terms which have multiple parents, including the parents.
Multiple inheritance offers the potential for more expressive and concise models in certain situations, particularly when dealing with entities that naturally belong to multiple distinct categories. However, the risk of ambiguity (the diamond problem), increased complexity, and potential for inconsistencies means it should be used judiciously and with careful design considerations. Often, alternative modeling techniques like using intermediate classes, interfaces (in programming analogies), or carefully defined relationships can achieve similar expressiveness with fewer drawbacks.
Advantages:
Increased Expressiveness and Granularity: Multiple inheritance allows a term to inherit characteristics (properties and relations) from multiple distinct parent concepts. This can lead to a more nuanced and accurate representation of real-world entities that naturally belong to more than one category. For example, a "Hybrid Car" inherits features from both "Electric Car" and "Gasoline Car."
Reduced Redundancy (in some cases): If a concept shares characteristics with multiple independent parent concepts, multiple inheritance can avoid the need to explicitly define those shared characteristics within the child term. Instead, it inherits them from the respective parents.
Facilitating Reusability: By inheriting from multiple parents, a child term can reuse existing definitions and relationships, promoting modularity and reducing the overall size and complexity of the model (compared to explicitly defining all characteristics).
Disadvantages:
The "Diamond Problem" (or Inheritance Ambiguity): This is the most significant challenge. It arises when a child term inherits from two parents that, in turn, share a common ancestor. If this common ancestor defines a property or relation, it becomes ambiguous which version the child should inherit. This requires explicit resolution mechanisms, which can complicate the model. For example:
LivingBeing
  /   \
  Animal Plant
  \   /
    Creature  (inherits from both Animal and Plant)
If LivingBeing has a property "hasCellStructure," does Creature inherit the animal cell structure or the plant cell structure, or both?
Increased Complexity and Reduced Understandability: Models with multiple inheritance can become significantly more complex to understand and reason about. Tracing the inheritance paths and resolving potential conflicts can be difficult for both humans and automated systems.
Potential for Logical Inconsistencies: If the inherited characteristics from multiple parents are contradictory, it can lead to logical inconsistencies within the model. Careful design is needed to avoid such situations.
Circular hierarchies
Lists the terms which are in a circular hierarchy (the Generalisation relation type)
Avoiding circular hierarchies in semantic modeling is crucial for maintaining logical consistency, enabling effective reasoning, and ensuring the overall integrity and understandability of the model.