Appearance
Creating a Conceptual Data Model
Creating a conceptual (or high-level) data model is the first crucial step in database design. It focuses on identifying the main Entities, their Attributes, and the Relations between them, without delving into technical details. This conceptual model serves as a communication tool between stakeholders and developers.
1: Business Requirements and Scope
Before designing anything, you need to thoroughly understand what the system is supposed to do and what data it needs to manage.
- Gather Information:
- Interview Stakeholders: Talk to users, business analysts, domain experts, and decision-makers. Ask open-ended questions about their processes, data needs, and pain points.
- Review Existing Documentation: Look at reports, forms, business rules, and any current system documentation.
- Observe Operations: If possible, observe the actual business processes to see how data is used.
- Define the Scope:
- Clearly articulate what the data model will cover and what it won't. This helps manage expectations and prevents scope creep.
- Identify Key Business Processes:
- Understand the main activities that generate or consume data. For example, "Placing an Order," "Registering a Customer," "Managing Inventory."
Visualizing the model will be a great help for the next steps. See Appendix A
2: Identify Entities
Entities are the fundamental "things" or objects about which you want to store information. They typically correspond to nouns in your business requirements.
- Brainstorm Potential Entities:
- Read through your gathered requirements and highlight all significant nouns. Examples:
Customer,Product,Order,Employee,Department.
- Read through your gathered requirements and highlight all significant nouns. Examples:
- Filter and Refine Entities:
- Is it distinct? Does each instance of this Entity need to be uniquely identifiable?
- Does it have Attributes? Does it have properties you want to store (e.g., a
Customerhas aName,Address, etc.)? - Is it relevant to the scope? Is it necessary for the system's purpose?
- Avoid Redundancy: Combine similar Entities if they represent the same concept.
- Examples of what might NOT be an Entity: A simple Attribute (e.g., "Color" might be an Attribute of "Product" rather than its own Entity, unless "Color" has its own complex properties like "Hex Code" and "Pantone ID").
3: Identify Attributes for Each Entity
Attributes are the characteristics or properties that describe an Entity.
- List Relevant Properties:
- For each identified Entity, list all the pieces of information you need to store about it.
- Example for
CustomerEntity:Customer ID,First Name,Last Name,Email Address,Phone Number,Shipping Address,Billing Address. - Example for
ProductEntity:Product ID,Name,Description,Price,Stock Quantity,Category.
- Determine Primary Keys:
- For each Entity, identify a unique identifier called the primary key. This Attribute (or set of Attributes) uniquely identifies each instance of the Entity.
- It should be unique, non-null, and stable (not likely to change). Often, an artificial ID (e.g.,
CustomerID,OrderID) is created if no natural unique identifier exists or is suitable.
- Refine Attributes:
- Granularity: Break down composite Attributes (e.g.,
Full NameintoFirst Name,Last Name). - Data Types (Conceptual): At this high level, you might just note the type of data (e.g.,
text,number,date,boolean) without specifying database-specific types. - Nullability: Consider if an Attribute can be optional (nullable) or if it's always required.
- Granularity: Break down composite Attributes (e.g.,
4: Identify Relations Between Entities
Relations describe how Entities are associated with each other.
- Find Associations:
- For every pair of Entities, ask: "Do these two Entities interact or relate in any way?"
- Example: A
Customerplaces anOrder. AnOrdercontainsProducts.
- Determine Relation Type (Cardinality):
- This defines how many instances of one Entity can relate to how many instances of another Entity.
- Refer to Cardinalities for more information.
- Assign Relation Names (Optional but Recommended):
- Use verbs to describe the Relation from both directions (e.g.,
CustomerplacesOrder;Orderis placed byCustomer).
- Use verbs to describe the Relation from both directions (e.g.,
5: Review and Refine the Model
This is an iterative process. The first draft is rarely the final one.
- Validate with Stakeholders:
- Present the conceptual data model to the business users and stakeholders.
- Explain the Entities, Attributes, and Relations in plain business language.
- Ask questions: "Does this accurately reflect your business processes?" "Are we missing any critical information?"
- Check for Completeness:
- Does the model capture all necessary data for the identified business requirements?
- Check for Consistency and Clarity:
- Are naming conventions consistent? Is the diagram easy to understand?
- Identify Ambiguities and Missing Information:
- Are there any Relations that are unclear? Any Attributes that need further definition?
- Iterate:
- Based on feedback, make necessary adjustments and repeat the review process until all stakeholders agree that the model accurately represents the business domain.
Appendices
A: Visualize with Termboard
Drawing diagrams helps in understanding and communicating the model. For the next steps you can use a visual way to create your model. Termboard provides you with all tools to visualize your conceptual model.
Open Conceptual Data Model Template
- Open .
- It uses:
- Rectangles for Entities.
- Ellipses connected to rectangles for Attributes.
- Arrow lines connecting Entities for Relations.
- Blue borders for Primary Keys
Draw the Diagram
Place Entities on Canvas
Placing elements (Terms) on the canvas is explained in the Create Term quickstart. You can provide the description of the Entity in the Term Sidebar
Using the provided template as mentioned above, you will get a few Extra Fields in the Term Sidebar. Choose the TAB DETAILS to see the Extra Fields.
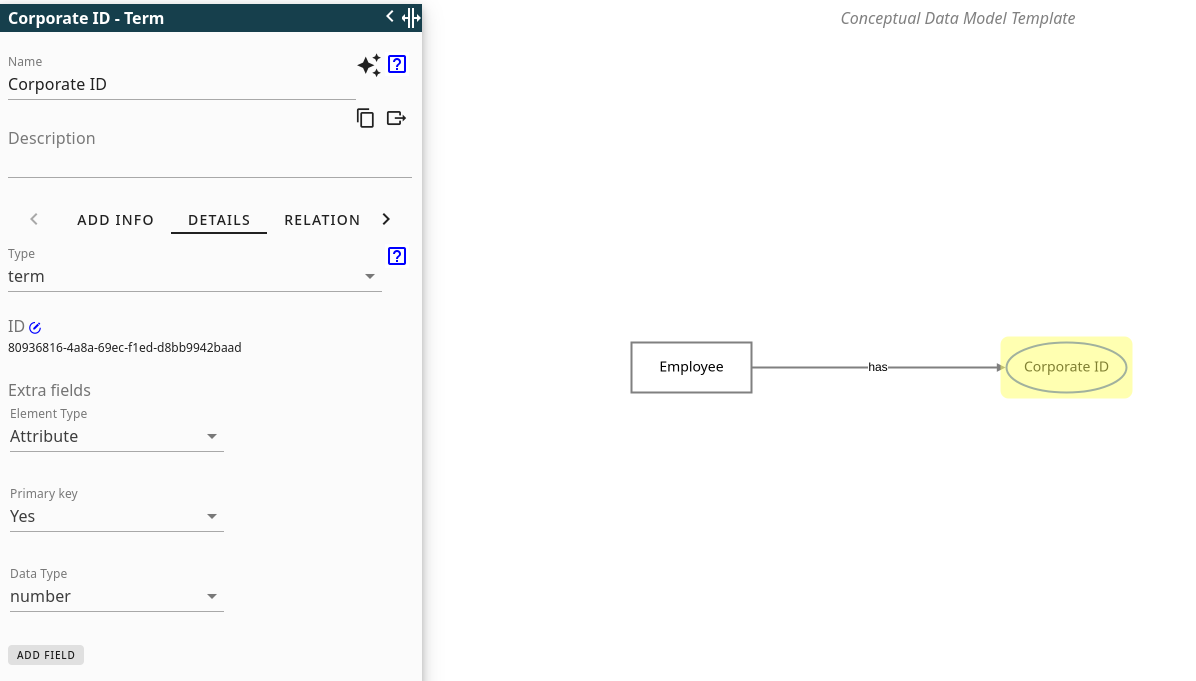
Element type: Specify if it is an 'Entity' (shows as rectangle) or an 'Attribute' (shows as ellipse)Primary key: Specify 'Yes' if it is a primary key (shows as blue border)Data type: Optionally specify the data type of the Attribute or Entity
Add Attributes to Entities
Adding Attributes works the same as adding Entities. Select for Element type 'Attribute'
Draw Relations
Adding Relations is explained in the Create Relation Quickstart. Similar to the Entities and Attributes you can also provide more information of the Relation in the sidebar. The Extra Fields are also available, but are not applicable for a Relation, so you can keep them empty.
Adding cardinalities to the Relations is explained here: Relation Details
Save and/or export
- First give your model a good Document name .
- You can quickly save it in the browser (works only local on your pc)
- You can save it for others to work on it
- You can also save it as image or complete PDF document